
Today we are starting a new blogging series on how to leverage Couchbase NoSQL from ColdFusion and also releasing some great new products under the Ortus stack throughout our series. Let's begin our Couchbase adventures with one of my favorite topics, Caching!
Caching is an important layer in today's applications that require high availability in clustered and standalone environments alike. Caching demands require fast performance, lots of storage, and the ability to scale horizontally so your cache infrastructure can grow with your needs. We take caching seriously which is why we've built tools like CacheBox which is not only a caching engine, but an aggregator and API for other cache systems. In-process caches, which run on the JVM alongside your application and share the same heap space, are convenient and easy to set up, but they have many limitations when it comes to scalability and redundancy.
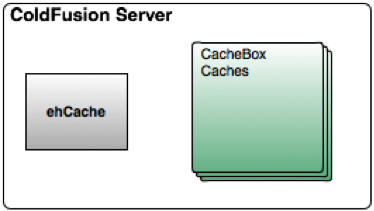
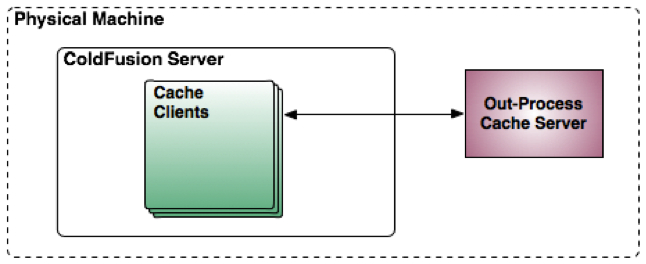
This is why we've spent time learning about other out-of-process and distributed caching strategies and have been working with Couchbase for a while now. Even though, Couchbase is in itself a NoSQL Database, it is also an amalgamation of CouchDB and Memcached on steroids with clustering, replication and distributed capabilities.
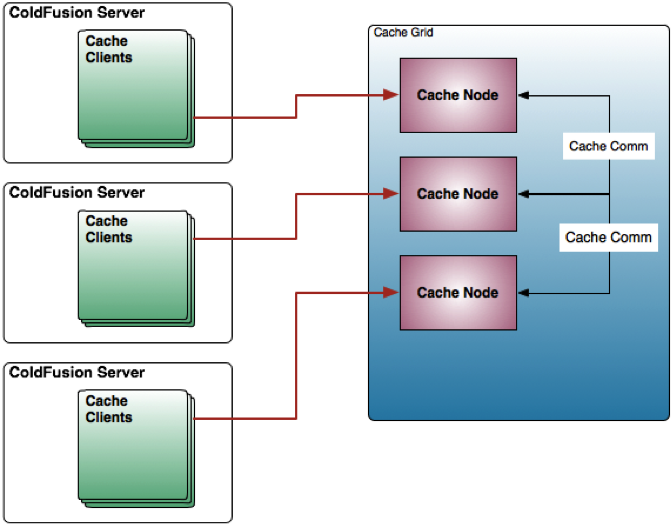
Couchbase Server
One of our favorite platforms is Couchbase Server. Couchbase is a combination of CouchDB's NoSQL engine with over-the-wire compatibility with the Memcached protocol-- a standard in the caching world. Couchbase can be used as an indexable, queryable JSON document store or a simple key/value store. Main benefits of Couchbase server are:
- Clustered - You can scale out a Couchbase cluster as large as you need it. There’s even cross data center replication (XDCR) for multiple, geo-located clusters and disastery recovery.
- Some solutions are RAM-only or Disk-only, but Couchbase uses a combination of RAM and Disk storage for its data.
- Data Replication and Auto-Failover: This is an amazing feature for high availability and redundancy that comes out of the box with Couchbase.
- Since Couchbase implements the Memcached protocol, it can be a drop-in replacement for Memcached to allow for things like larger document sizes.
- Unlike Memcached, Couchbase Server gives you any number of named storage locations called vBuckets; each of which have their own storage, configurations, document views and statistics.
- It has a really nice web-based real-time interface for managing it. Very nice for a free open source offering!
- It’s fast-- REALLY fast. Every operation is asynchronous and setting a simple value into Couchbase can be as fast as 25 microseconds. That’s .000025 seconds!
- They have client SDK libraries available for Java, .Net, PHP, Ruby, C, Python and others so it’s very accessible from any project. The Java SDK is what we’ll be using throughout this series. (They also have experimental libraries for node.js and go)
- It’s professionally backed, just like ColdBox and ContentBox so professional licenses are available that come with support programs.
Getting Started
Let’s get started and take a quick look at Couchbase. The service can be installed on about any commodity machine. You can put it alongside your web servers, or on machines of their own. For testing and development, just install it on any local PC/MAC and use VMWare Fusion or Virtual Box Linux VMs to test clustering, replication and fail-overs. Visit http://www.couchbase.com/download and choose an installer for your platform. Both the Community and Enterprise Edition are free to use if you only want to set up a single node. You only need to pay if you want to use more than two instances of the Enterprise Edition, which has the latest enhancements, patches and it is commercially supported. You can configure as many Community Edition nodes as your heart desires for free as long as you’re willing to use the community support available at http://www.couchbase.com/communities/. Here is a nice description of both editions: http://www.couchbase.com/couchbase-server/editions
If you are installing on Windows, just execute the installer and follow the instructions. If you are installing on Ubuntu, use wget to download the .deb file and use commands similar to below to install.
sudo apt-get install libssl0.9.8
sudo dpkg -i couchbase-server couchbase-server-community_x86_64_2.0.1.deb
Here is a 6-minute video to help you get Couchbase installed and configured:
To view the web-based administrator console for Couchbase, simply hit the machine that has Couchbase installed on port 8091 like so:
http://localhost:8091
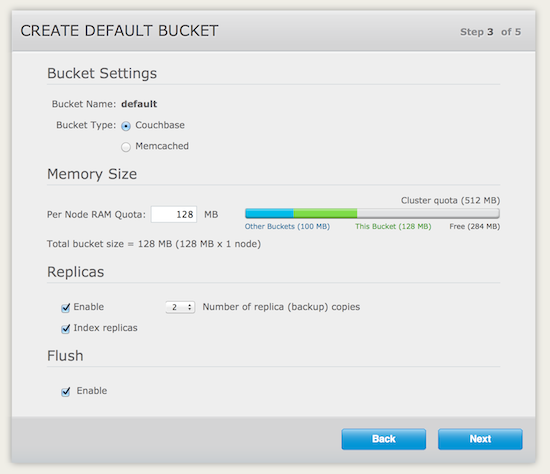
If this is the first time you hit the Couchbase administrator you will be prompted with the setup wizard that will take you by the hand and configure your first cluster and you first data buckets. When you configure your first server, make sure all other servers you plan on adding to the cluster have enough RAM to support your “Per Server RAM Quota”.
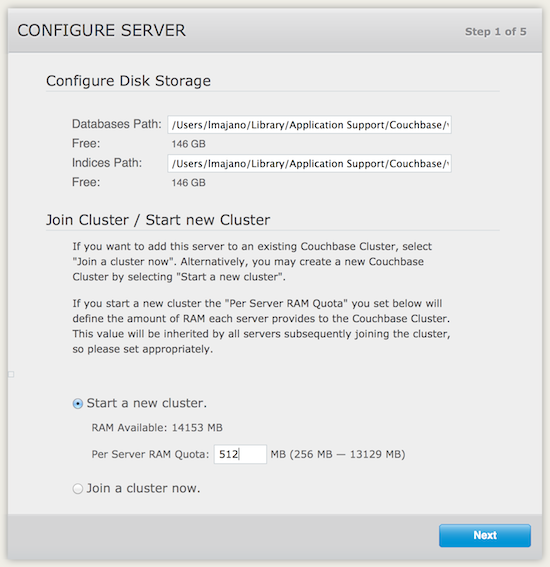
The installer will have you create your first bucket as part of the install process. The amount of RAM you choose here will be used from the Couchbase server total. For example, if you assign 512MB to the Couchbase server, you could have one 512MB bucket, two 256MB buckets, or 4 128MB buckets. The important point is that the size of all your buckets cannot exceed the total assigned to the Couchbase server.
You can alter the size of the cluster once deployed by using the awesome Couchbase Command Line Interface (CLI).
Peeking Inside
You will need login to the admin using the password you configured during installation. Please note that the user name is case sensitive and by default the user is “Administrator”. Inside the administrator you will see severeal main tabs across the top. The first three are as follows:
- Cluster Overview - Shows you an overview everything in the cluster
- Server Nodes - Provides a list of all nodes that are part of your cluster and allows you to add/remove/reblance them
- Data Buckets - This gives you a list of all buckets that stored in the cluster.
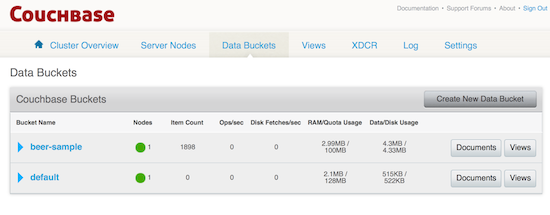
Right now your cluster only consists of a single node, but we’ll show how to scale out in our next blog post. If you click on “Data Buckets” in the menu, you can see a list of what buckets exist and how many documents are in each bucket. If you are using Couchbase for caching, think of it as a simple key value store. Each document has a unique identifier and then the value of whatever you’re storing. Complex values like arrays, queries, or objects can be serialized and represented in a visible string form.
If you want to use Couchbase as a database, NoSQL document stores let you store a JSON document that has no predefined structure or data types; thus a flexible data model. There’s no concept of tables or columns, instead you simply have multiple buckets of any number of documents. Instead of storing relational data in a separate table, all the related information is stored inside your JSON document. You are able to define indexes on keys in the JSON document in order to have very fast querying using what Couchbase calls: views.
To create a new bucket, click the “Create New Data Bucket” button and provide the name and password for the new bucket. You can also choose how much RAM you want to dedicate to the bucket. The cluster has a maximum amount of RAM that is shared by all buckets that shows up on the “Cluster Overview” page. Changing the RAM allocated to the cluster after you’ve created it is possible (as well as many other things) through the CLI executable:
C:\Program Files\Couchbase\Server\bin\couchbase-cli cluster-edit -c localhost:8091 -u Administrator -p pa$$ --cluster-ramsize=2048
Hooking It Up
If you’re connecting to Couchbase with a tool that uses the native Couchbase libraries, you will be able to specify a bucket name and password. You will be connecting on port 8091 and hitting the REST web service that Couchbase server exposes. It will probably look something like this:
http://localhost:8091/pool
If you are wanting to connect to Couchbase with a Memcached client, you can connect on the standard Memcached port of 11211. You can configure as many buckets as you want on port 11211, but Memcached clients connecting on that port will always use the bucket named “default”. Since the Memcached protocol has no concept of named buckets, “default” is a special bucket name that doesn’t require authentication. The connection string will look like this:
localhost:11211
You can also connect a Memcached client to another named bucket, but you will need to specify a different port for that bucket and then use that port in your connection string. You must use a port that no other bucket is using and have one custom port per bucket.
Once you start hitting the Couchbase server, you view an entire screen of auto-updating graphs that features “ops per second” by default in rolling time spans that go back 1 minute, hour, day, week, etc.
Conclusion
Hopefully you’re ready to plug Couchbase into your code and start using it. It’s fast, scalable, durable and can easily be used as a Hibernate secondary cache, Railo session/query/function cache, ColdBox template cache, or a general cache for your application code. In the next entry in this series, we’ll be showing you some exciting tools Ortus has been working on to make Couchbase readily accessible in your CFML code. You can let us help you take your application to the next level with our CouchBase tools whether or not you’re using the ColdBox Platform.
Read our next article in the series: Couchbase: Cluster Setup + ORM Secondary Cache Introduction.



Add Your Comment
(1)
Aug 17, 2013 12:03:20 UTC
by Grant Copley
Great series Brad! Thanks for posting this.